
_MIMAS Stereo Calibration
Generally, there are many challenges associated with properly matching the levels of two mono units intended to function in stereo. This becomes even more complex with FET-type compressors. This tutorial will guide you through straightforward steps to configure the levels of two WesAudio _MIMAS units.
Few Things to Note:
_MIMAS was the first product in our portfolio, undergoing significant changes on the digital management side, including improvements and adaptations due to component restrictions.
Some features described below may not be available on your unit’s revision. The following features are relevant for this tutorial:
- High-resolution management of input and output levels: While not mandatory for level matching, this feature helps units achieve closer level alignment.
- Metering after the first level potentiometer: This feature is mandatory for this tutorial and was introduced in revision 1.5.
What You Will Need:
- 2 x _MIMAS units installed in a chassis and connected to the GCon service (via direct USB or through the _TITAN).
- An audio interface connected to the chassis.
- A sine wave signal generator plug-in (available in most DAWs).
- A DAW (any DAW will do).
1. First, you need to open GConManager in admin mode. For instructions on how to do this, please refer to the FAQ section on our website: https://wesaudio.com/faq/
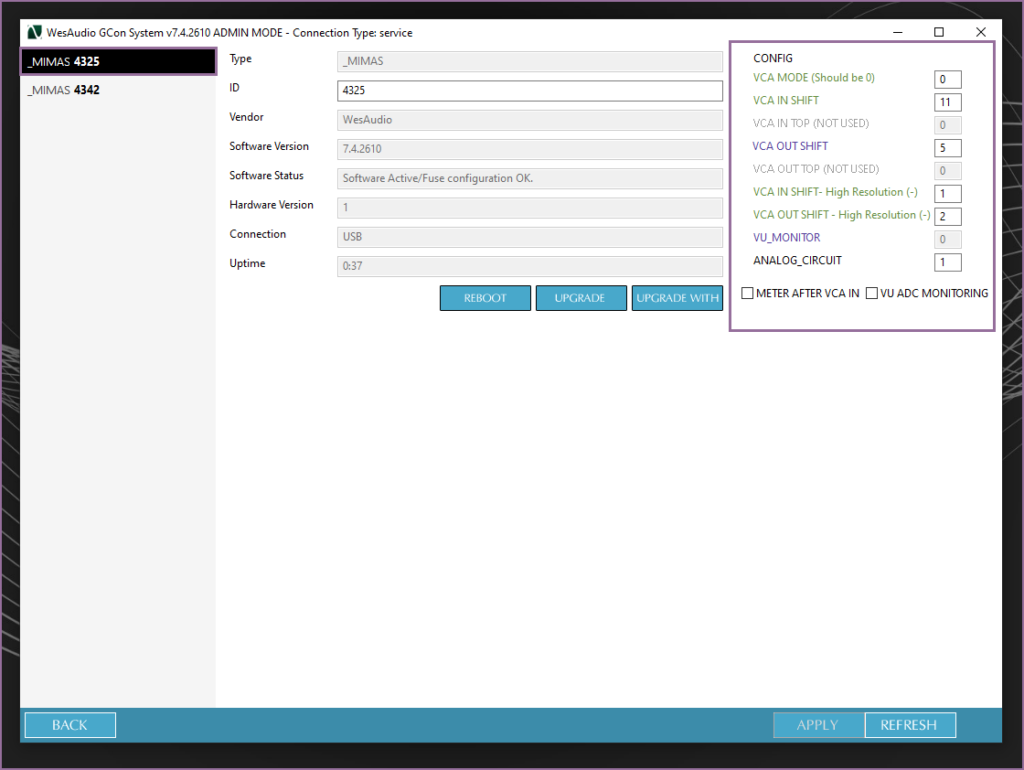
2. Admin mode enables special functionalities used during the calibration of WesAudio units. Navigate to the _CONFIG app and select the first _MIMAS unit. On the right side of the screen, you will see some unusual parameters. It’s a good practice to write down these parameters as a backup for each unit you plan to calibrate.
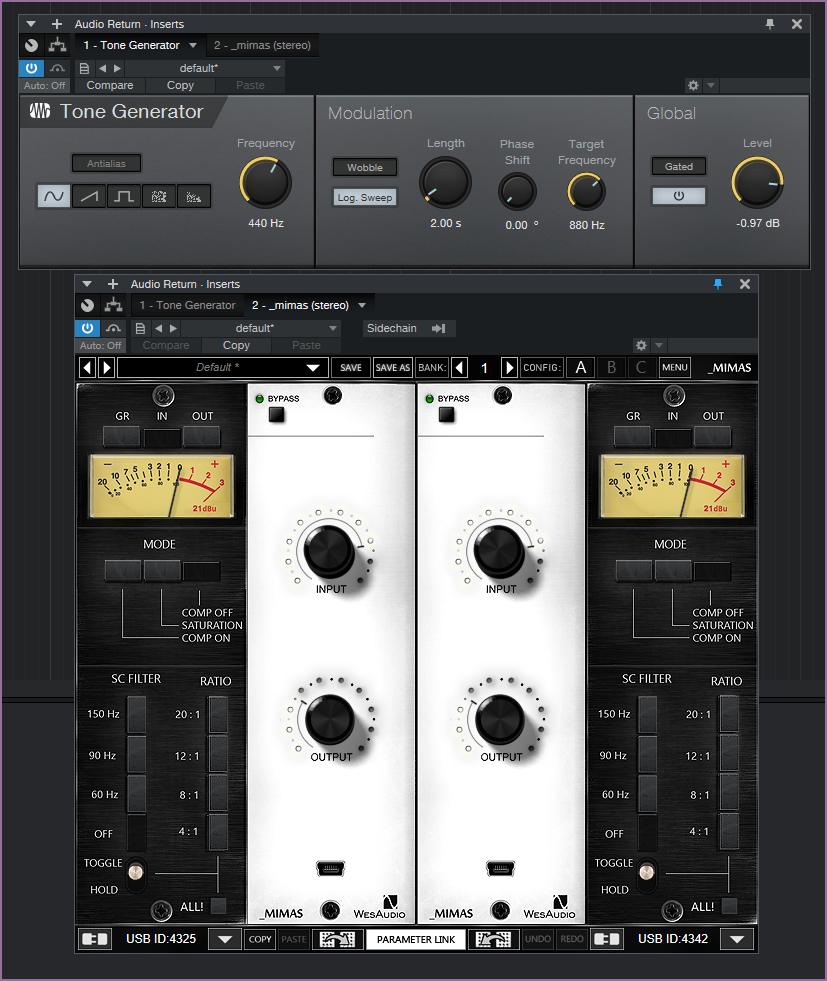
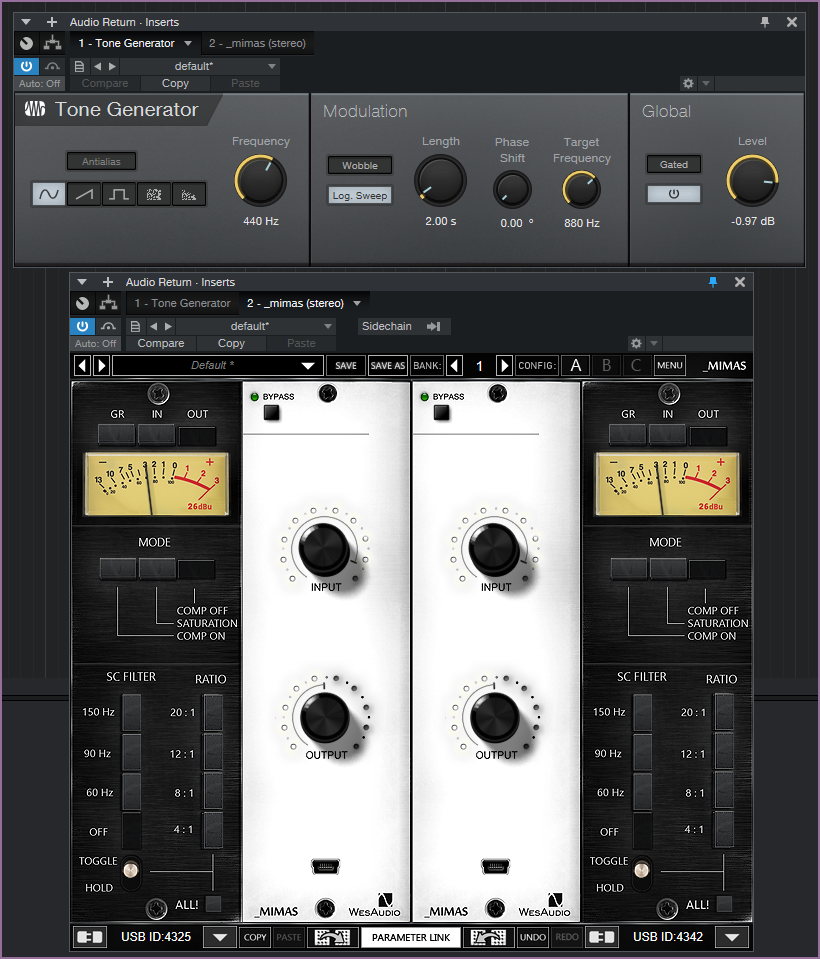
- Open your DAW and insert the WesAudio _MIMAS (stereo) plug-in anywhere in the session (the placement of the instance does not matter). Follow these steps:
- Connect the plug-in to the hardware units.
- Set Compression to OFF.
- Set Metering to IN.
- Send a signal from the signal generator so that the meters on both units show around 0 dBu. If this level is not achievable with your audio interface, a lower level is acceptable, but it should ideally fall between -3 and 0 dBu due to resolution limitations.
Check the meters on both units:
- Both meters should display exactly the same value.
- If the values differ:
- The signal reaching the units may not be even (most likely).
- Or, there could be an issue with the internal unit circuit (unlikely, as input metering occurs just after the transformer).
If the values are not the same, please contact us by email at support@wesaudio.com
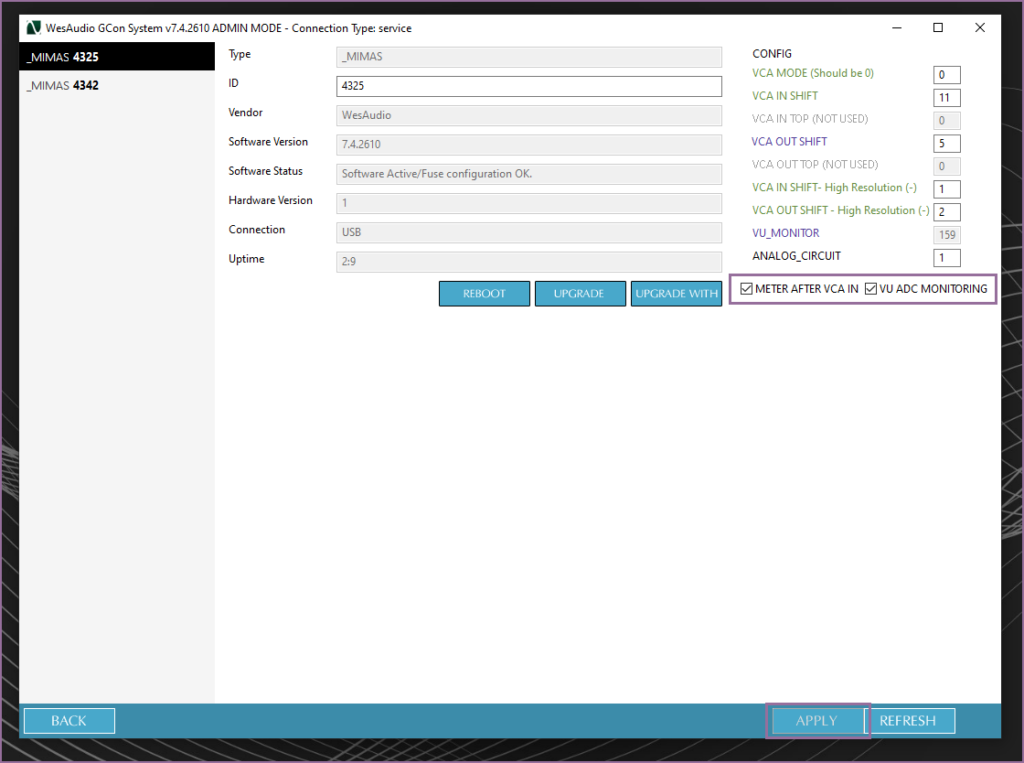
- Next, go to GConManager in ADMIN mode and enable the following checkboxes:
- “METER AFTER VCA IN”
- “VU ADC MONITORING”
Follow these steps:
- Enable the checkboxes for the first selected unit.
- Click the “APPLY” button.
After doing this, you will notice the following:
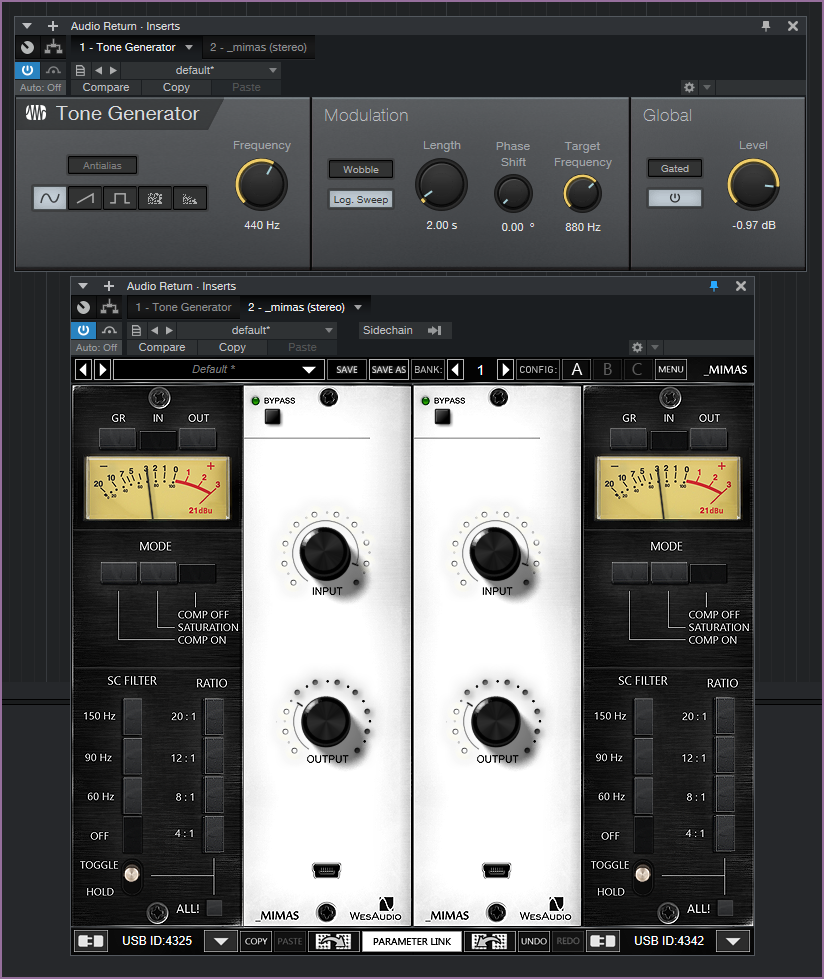
- The meter value in the plug-in will change.
- If you adjust the INPUT knob, the meter position will also change, reflecting any modifications to the input potentiometer.
IMPORTANT:
- If the meter position does not respond to INPUT knob adjustments, it likely means that your unit revision does not support this functionality. In this case, you will not be able to configure your units using this tutorial.
Repeat these steps for the second unit.
- Adjust the INPUT knob so that the VU IN Meter on one of the units shows -3 dBu. Follow these steps based on the results:
If both units display the same value:
- Skip this step and proceed to the next one.
If the second unit displays a different value:
- Do not alter the configuration of the unit that is already set to -3 dBu. This unit will remain unchanged. Only adjust the second unit’s configuration. (The term “second unit” is simply used for reference and does not imply it is inferior.)
- In GConManager ADMIN mode, select the first unit (correctly set to -3 dBu) and write down the ADC monitoring (VU_MONITOR) values displayed in the software. These values may vary slightly but should generally remain within a range of 3–5 values.
- Select the second unit in GConManager ADMIN mode and adjust its parameters as follows:
- VCA IN SHIFT:
- This parameter affects the signal in approximately 0.5 dB steps.
- Increasing the value raises the signal level.
- VCA IN SHIFT – High Resolution:
- This parameter fine-tunes the signal in 0–0.5 dB steps.
- Values range from 0 to 3, providing additional precision.
IMPORTANT:
If adjusting VCA IN SHIFT – High Resolution does not change the meter output or the VU_MONITOR value, it means your unit revision does not support this functionality. In this case, use VCA IN SHIFT exclusively.
- VCA IN SHIFT:
- Adjust these parameters on the second unit until:
- The meter on the second unit matches as closely as possible to -3 dBu.
- The VU_MONITOR values are similar to those recorded for the first unit.
6. Now that the input levels are matched, you can move on to calibrating the output levels.
7. Disable the “METER AFTER VCA IN” and “VU ADC MONITORING” checkboxes for both units. After disabling each checkbox, click the Apply button for each unit.
8. The meter should now return to its previous state, showing 0 dBu, unless you had to feed the unit with a different level earlier. (This metering is monitoring the signal before the input level control.)
9. Switch the metering in the plug-in to OUT.
10. Adjust the OUTPUT knob so that the VU IN Meter on one of the units displays -3 dBu, following the same process as described previously with the following differences:
- Instead of relying solely on VU_MONITOR, you can use any meter available in your DAW or on your audio interface.
- NOTE: A reading of -3 dBu on the _MIMAS meter corresponds to a 20 dBu signal, which may be too high for some converters. If you notice your converters are clipping, lower the signal on _MIMAS—for example, to -5 dBu.
The parameters to adjust the signal are “VCA OUT SHIFT” and “VCA OUT SHIFT – High Resolution”, using the same rules as for the INPUT adjustments.
Now, after making the necessary adjustments, the meters on both units should display values in exactly the same position.
In case of any issues, please contact support@wesaudio.com
_MIMAS GR Calibration
FET designs, including _MIMAS, often require periodic calibration of metering levels. The gain reduction metering reference level may need adjustment over time. It is not uncommon for _MIMAS to activate the gain reduction LEDs on the front panel even when no signal is present.
To calibrate the metering, follow these simple steps:
-
- Power ON the chassis with the _MIMAS unit installed and allow it to warm up for approximately 20 minutes.
- Adjust the Gain Reduction Trimmer:
- Power OFF the chassis.
- Remove the _MIMAS unit from the chassis.
- If the gain reduction LED is lighting up without any signal, adjust the trimmer counter-clockwise by HALF a circle as shown below:
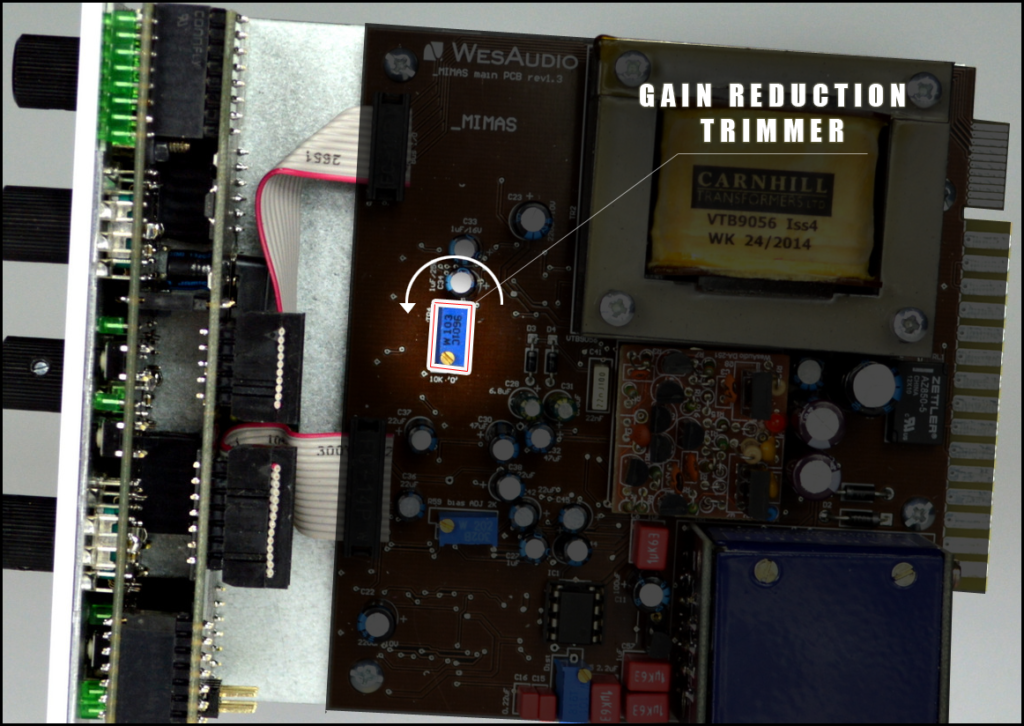
4. If, for any reason, the unit does not display gain reduction on the meter when gain reduction is actually occurring, adjust the trimmer clockwise by HALF a circle as shown below:
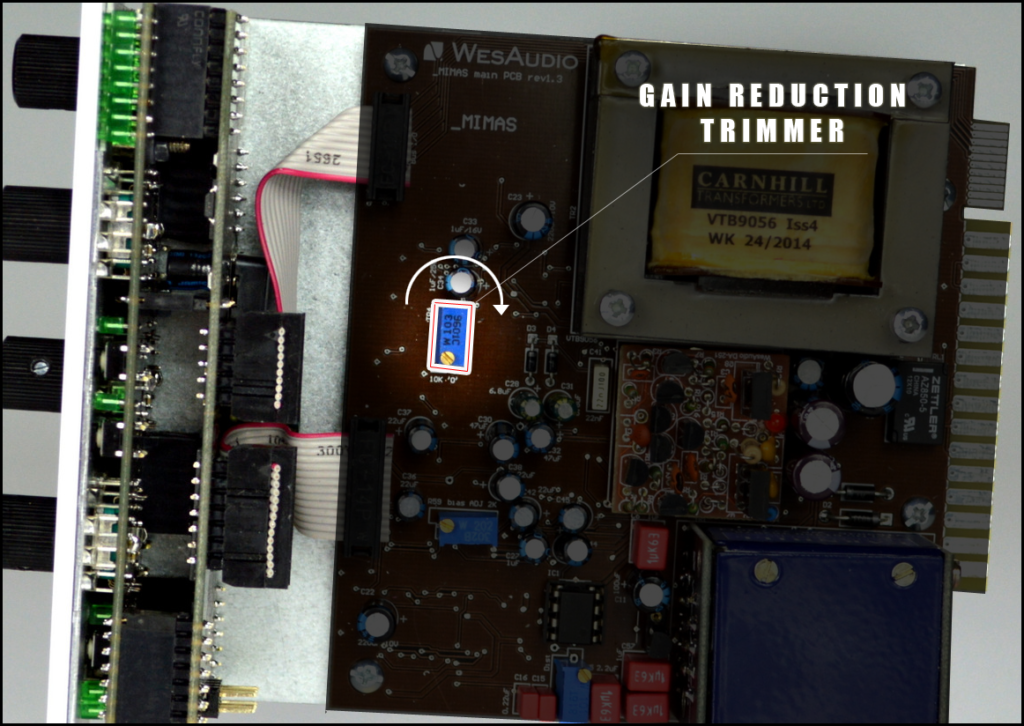
5. If the _MIMAS unit still does not display gain reduction correctly, repeat this procedure starting from point 2.