
SSL UF8 integration
The SSL UF8 controller provides three configurable layers, each capable of controlling either the DAW or the ngLEVELER. These layers allow you to easily switch between DAW and ngLEVELER control without needing the GCon Server with DAW automation mode. This flexible setup lets you customize your control surface to suit different tasks and workflows.
Connecting SSL UF8 to control ngLEVELER plugin
To get started, download and install the SSL 360 application from the Solid State Logic website.
Once the application is open:
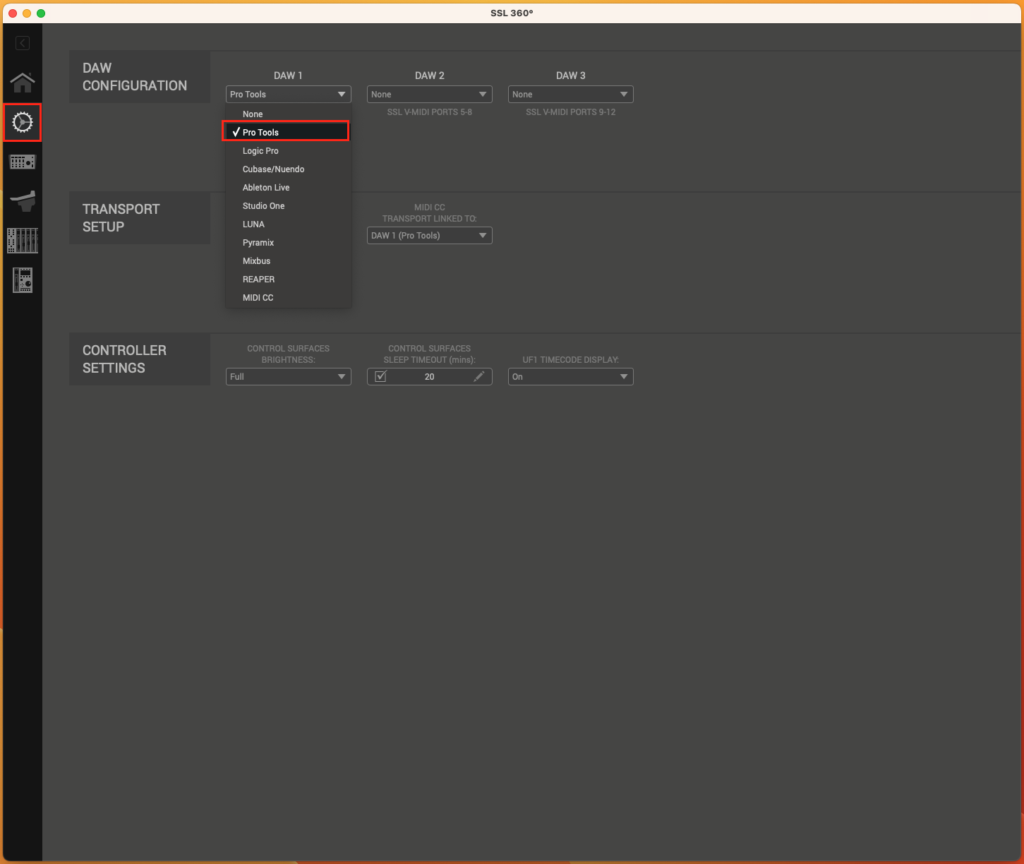
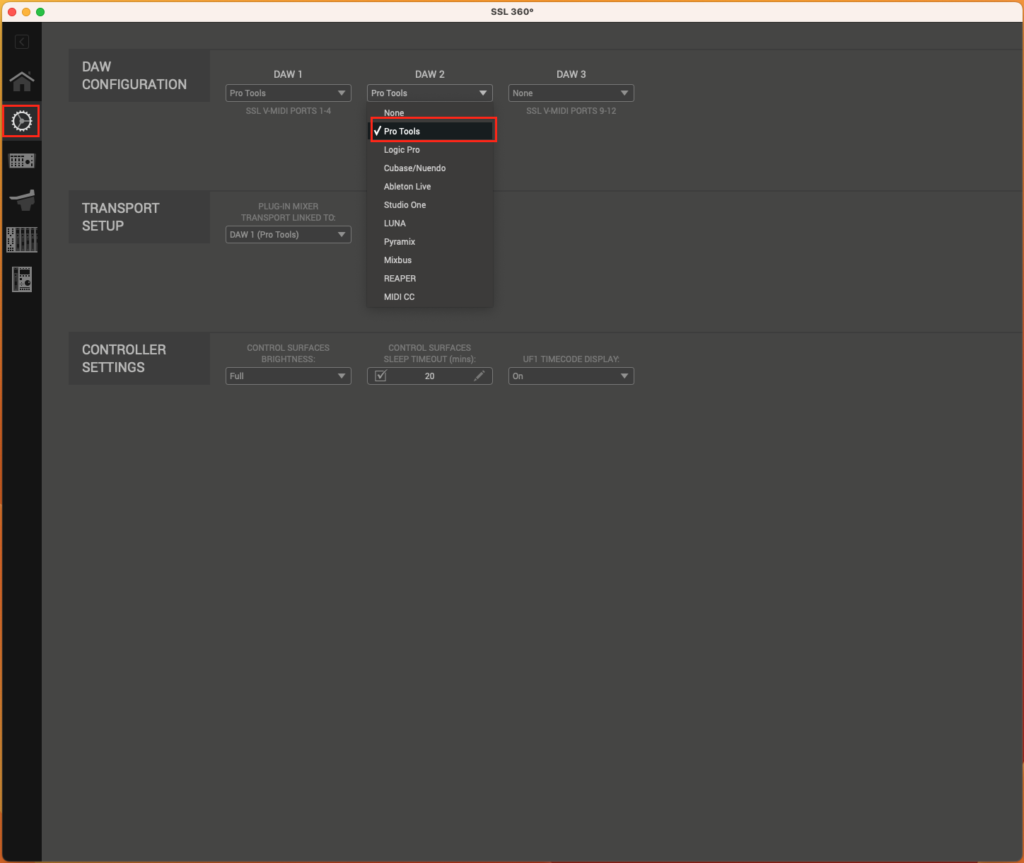
- Navigate to “CONTROL SETUP.”
- In the “DAW CONFIGURATION” section, expand the dropdown menu labeled “DAW 1.”
- Select your DAW from the list. For this guide, we’ll demonstrate how to connect the SSL UF8 to control ngLEVELER in Pro Tools.
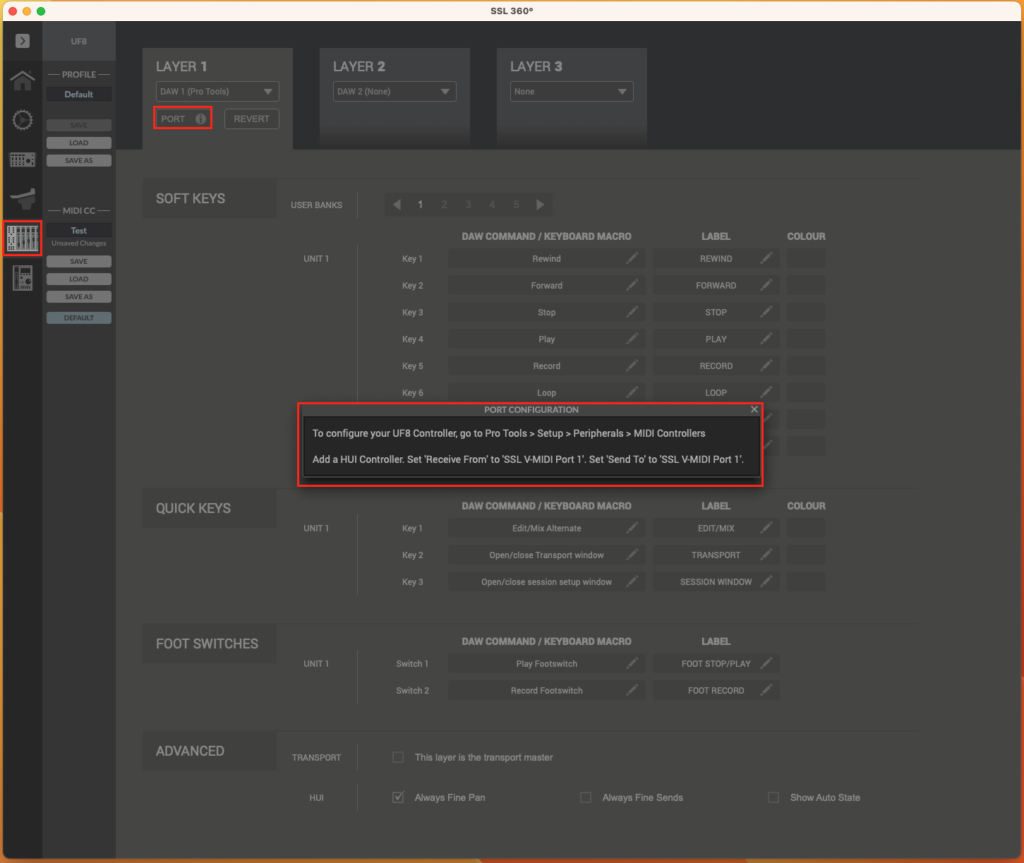
Next, navigate to the SSL UF8 tab.
Click on “Layer 1,” then select the “PORT” button. A popup window will appear, providing instructions on which MIDI channels to use for connecting to GCon Control.
IMPORTANT: This information is essential for configuring ngLEVELER within GCon Manager.
After completing the SSL UF8 configuration, proceed to set up ngLEVELER:
- Open GCon Manager.
- Navigate to the “_CONTROL” tab.
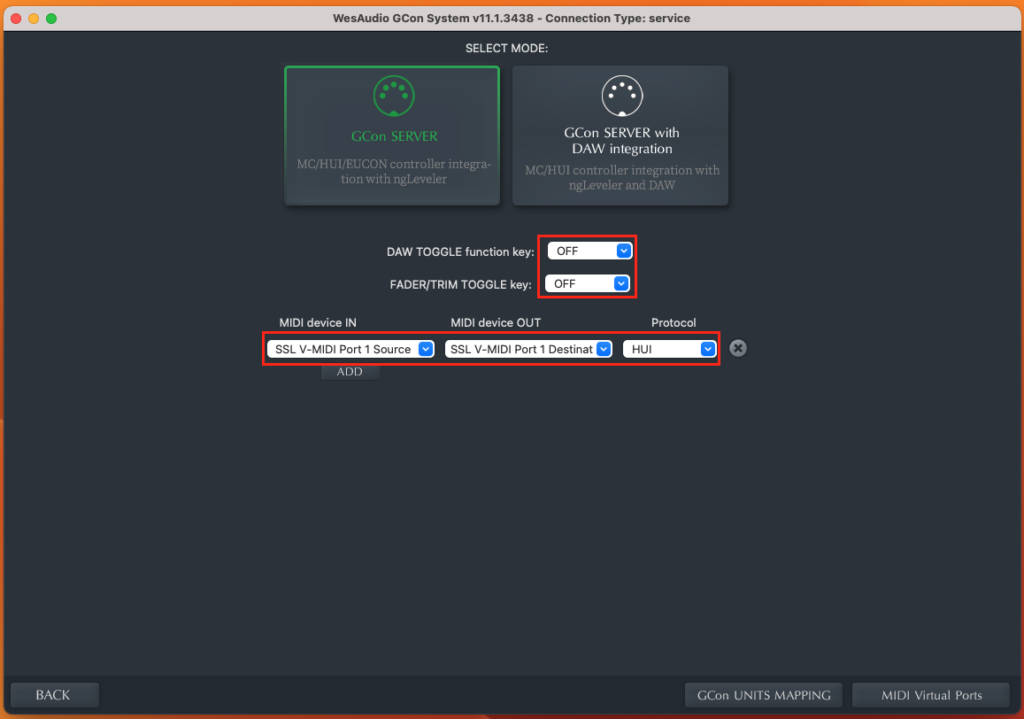
- Choose “GCon SERVER.”
- Set DAW TOGGLE and FADER/TRIM to OFF.
- Click “ADD” button.
To assign ngLEVELER control to the SSL UF8 layer, select the first MIDI channel as input and output (SSL V-MIDI Port 1).
Important Note: The DAW TOGGLE function key has been replaced by LAYERS in SSL UF8. The FADER/TRIM key won’t operate with the MIDI controller unless manually mapped.
When you select Layer 1, the faders should automatically sync with ngLEVELER, reflecting the same states as displayed in the plugin.
After completing this guide, you’ll be able to control ngLEVELER through Layer 1 using your SSL UF8 MIDI device.
Creating a Second Layer to Control DAW Functions with SSL UF8
Important Notification on Layer Configuration!
The SSL UF8 provides 3 distinct layers, allowing you to control your DAW on one layer and manage your plugins on another.
Keep in mind that each layer requires its own input and output channels to independently control the DAW and plugins.
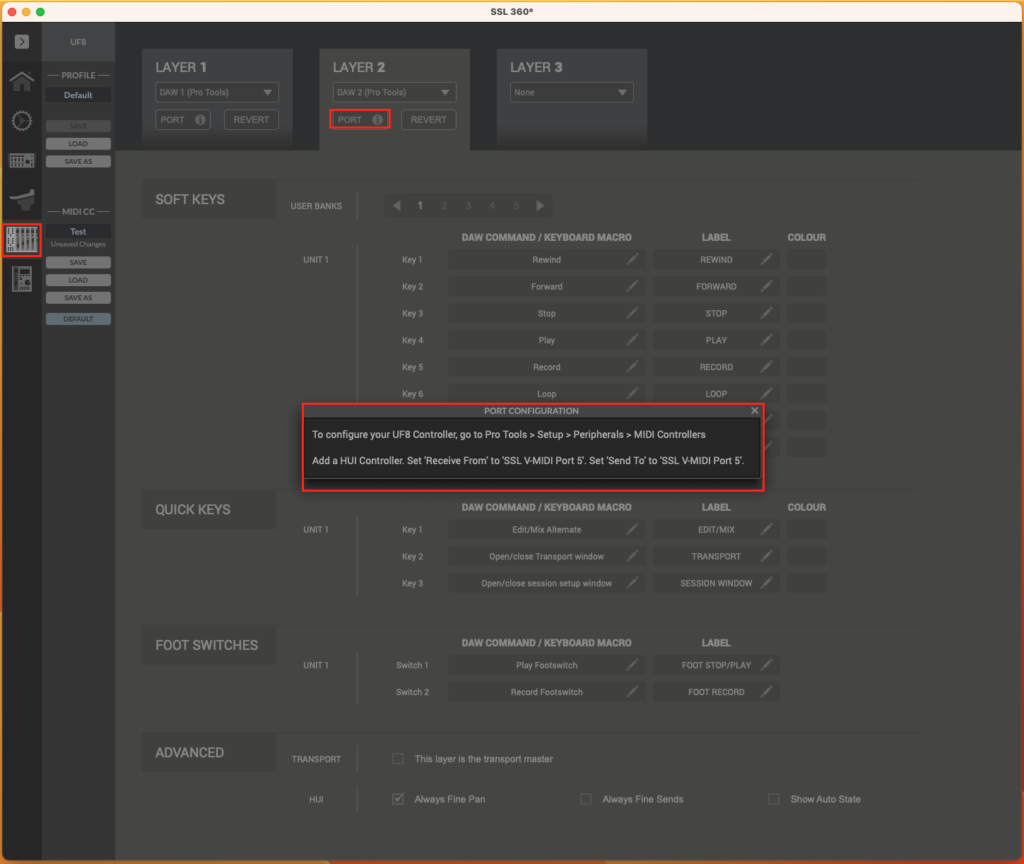
Next, open your DAW settings and configure the UF8 following the instructions provided after clicking the “PORT” button in the SSL 360 application.
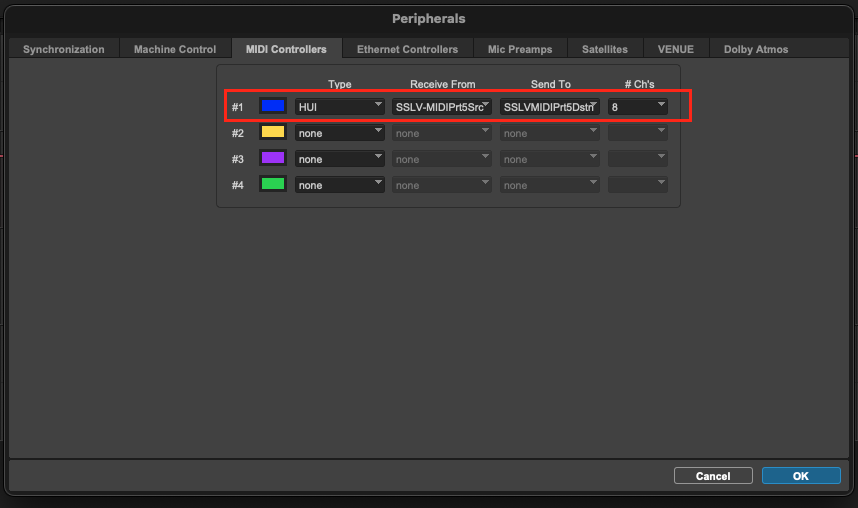
For Pro Tools (or refer to the specific manual for other DAWs):
- Navigate to: Setup -> Peripherals -> MIDI Controllers.
- Set both the input and output to SSL V-MIDI Port 5 (as previously indicated).
After completing this guide, you’ll be able to control your DAW using Layer 2 on your SSL UF8 MIDI device.
Behringer X-Touch integration
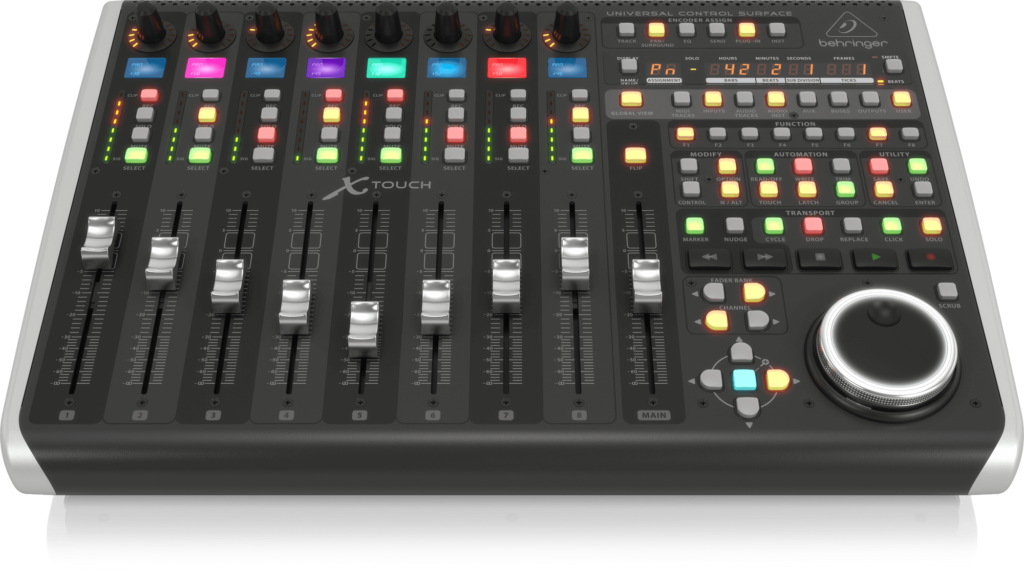
The Behringer X-Touch, when paired with the ngLEVELER, offers a powerful and intuitive control setup. By utilizing the Mackie Control or HUI protocol, this combination provides seamless integration, allowing for precise adjustments and efficient workflow management. This guide will walk you through the steps to set up and optimize your Behringer X-Touch with ngLEVELER.
Connecting Behringer X-Touch to control ngLEVELER plugin
To set up your Behringer X-Touch for controlling ngLEVELER, begin by connecting the X-Touch to your system and installing the necessary software from the manufacturer’s website.
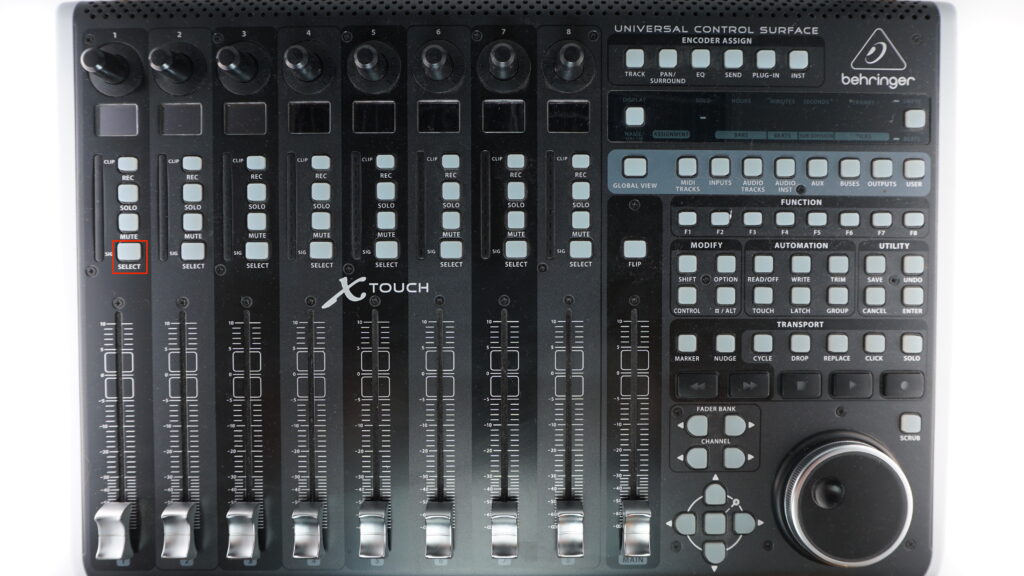
Next, press and hold the select button on the first channel while powering on the device. Keep holding the select button until the communication modes (Mackie or HUI) appear on the display.
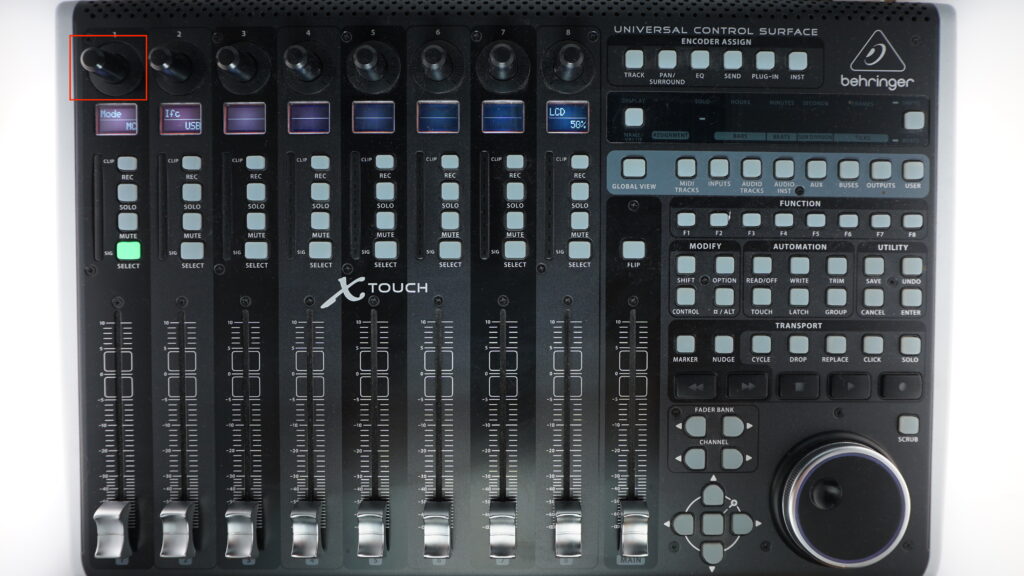
Use the encoder near the screen to select your preferred communication mode.
IMPORTANT: Ensure that the protocol configured for ngLEVELER in GCon matches the mode set on the Behringer X-Touch. You can choose either HUI or Mackie Control (MC), but it’s crucial that both devices are set to the same protocol for proper functionality.
To set up ngLEVELER:
- Open GCon Manager.
- Go to the “_CONTROL” Tab.
- Select “GCon SERVER”.
- Leave the DAW TOGGLE and FADER/TRIM settings as default.
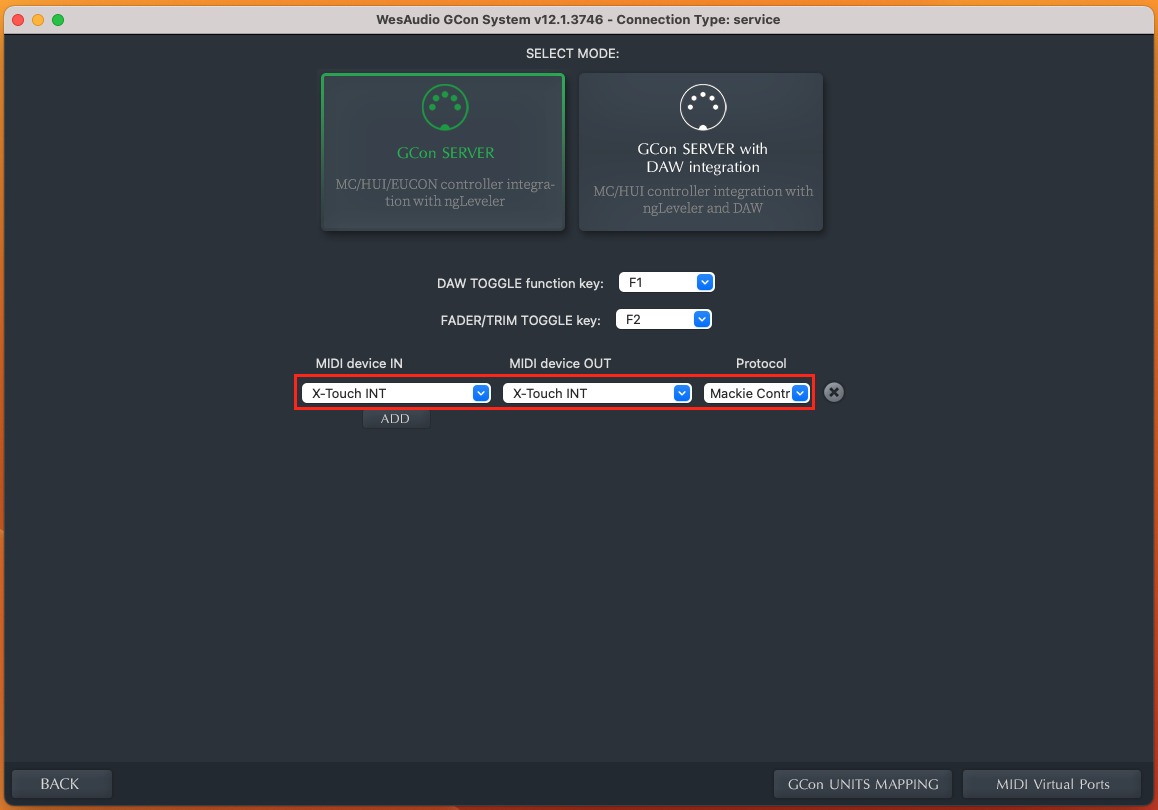
To assign control of ngLEVELER to the Behringer X-Touch:
- Set “MIDI Device IN” to “X-Touch INT.”
- Set “MIDI Device OUT” to “X-Touch INT.”
- Set “Protocol” to “Mackie Control.”
Behringer X-Touch Integration with ngLEVELER and DAW
To control both the DAW and the ngLEVELER plugin, you’ll need to create MIDI virtual ports. This guide will walk you through the process.
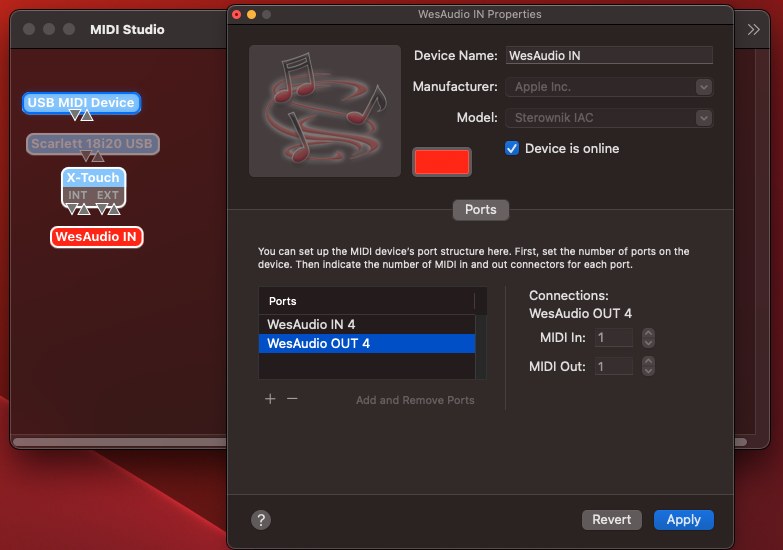
Creating Virtual MIDI Ports on macOS
MacOS provides built-in support for creating virtual MIDI ports, which can be easily managed by following these steps:
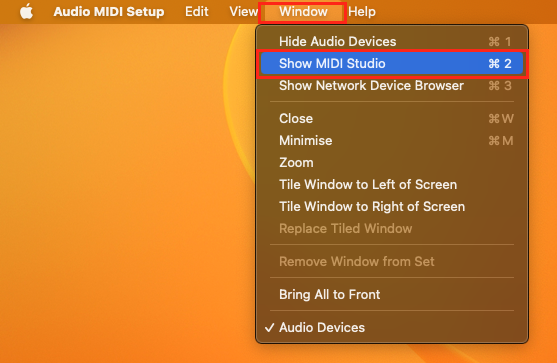
- Navigate to
/Applications/Utilitiesand open “Audio MIDI Setup.” - In “Audio MIDI Setup,” go to the “Window” menu and select “Show MIDI Studio.”
Open the IAC (Inter-Application Communication) driver and activate it by checking the “Device is online” option. This section enables you to manage your MIDI ports.
Creating Virtual MIDI Ports on Windows
Windows doesn’t natively support the creation of virtual MIDI ports, so you’ll need to use third-party applications. Some options include:
- loopMIDI by Tobias Erichsen
- MIDI Yoke, available through the MIDI-OX Utility
This manual does not provide setup instructions for these tools. For guidance on creating virtual MIDI ports on Windows, please refer to online tutorials specific to these applications.
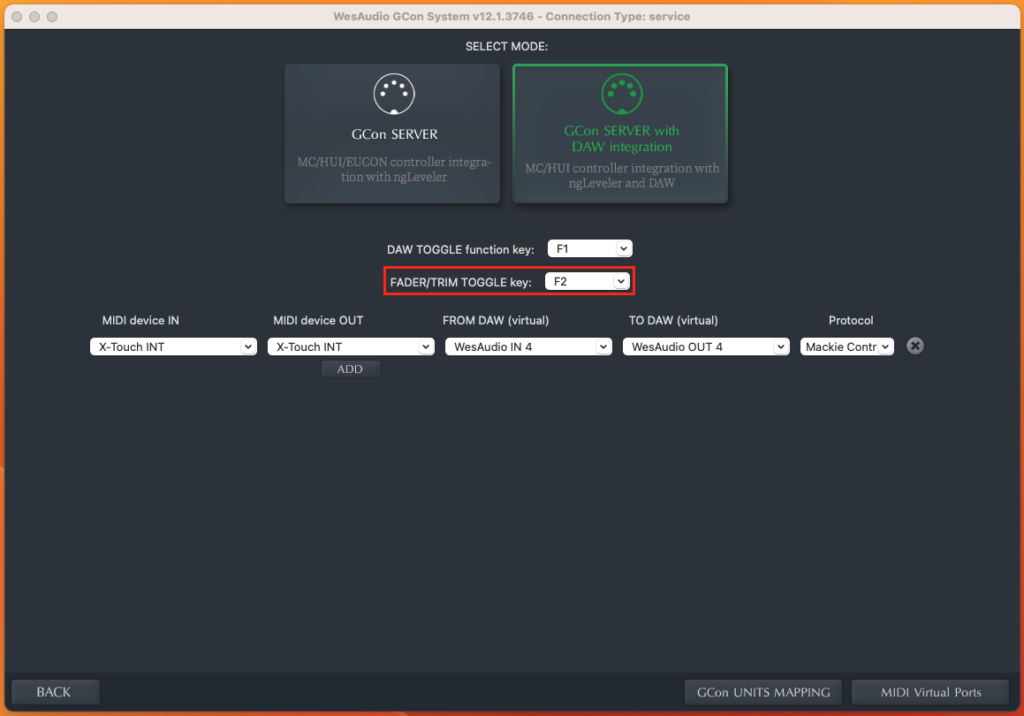
To set up ngLEVELER:
- Open GCon Manager.
- Go to the “_CONTROL” Tab.
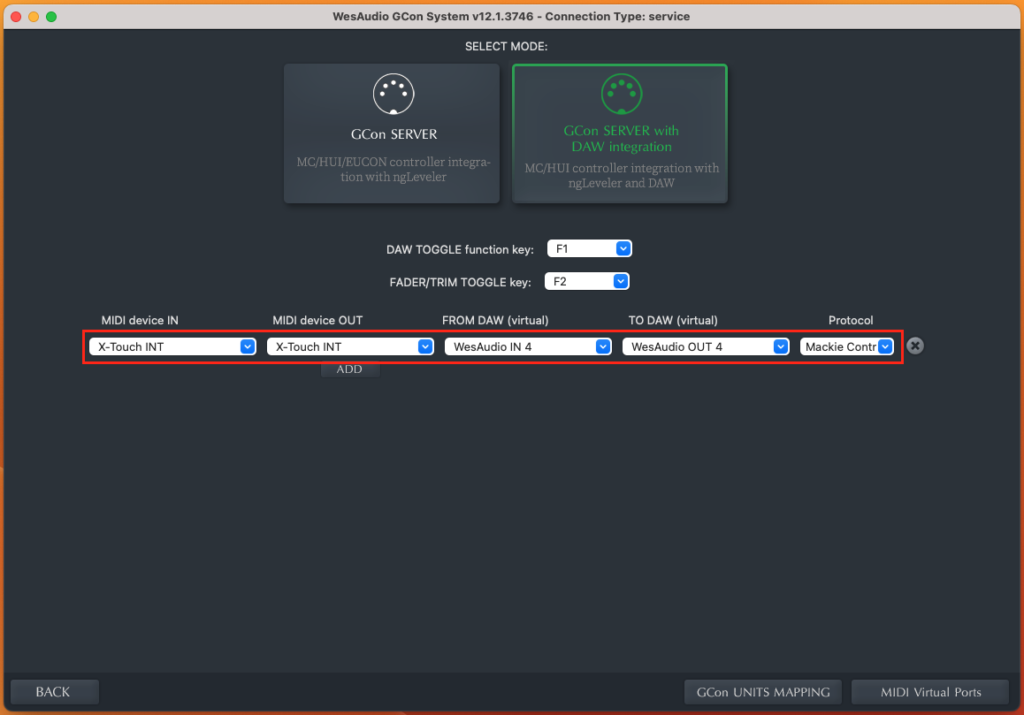
- Select “GCon SERVER with DAW integration.”
- Leave the DAW TOGGLE and FADER/TRIM settings as default.
To assign control of ngLEVELER to the Behringer X-Touch:
- Set “MIDI Device IN” to “X-Touch INT.”
- Set “MIDI Device OUT” to “X-Touch INT.”
- Set “Protocol” to “Mackie Control.”
To assign control of DAW to the Behringer X-Touch:
- Set “FROM DAW” to “WesAudio IN 4.”
- Set “TO DAW” to “WesAudio OUT 4.”
DAW configuration (Based on Studio One)
To configure Studio One in alignment with the previous GConManager setup:
- Open Studio One and navigate to the “Studio One” menu.
- Select “Preferences” and then go to the “External Devices” tab.
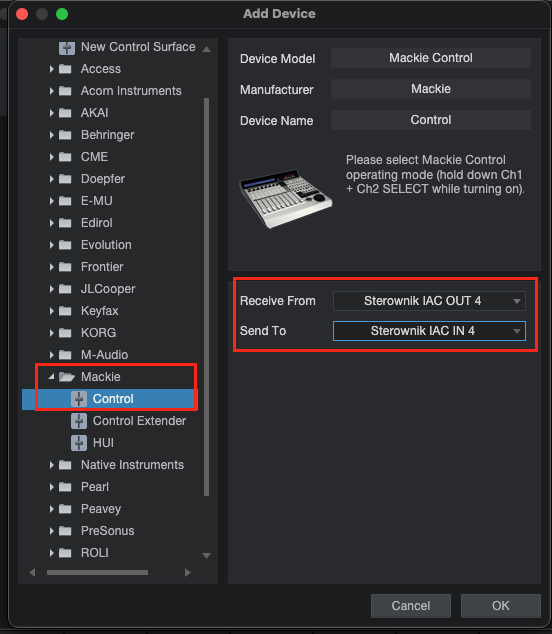
- Click “Add” to open the configuration window.
- Select “Mackie” and expand the list.
- Choose “Control.”
- Set “Receive From” to “IAC OUT 4.”
- Set ” Send To” to “IAC IN 4.”
Additional Functions
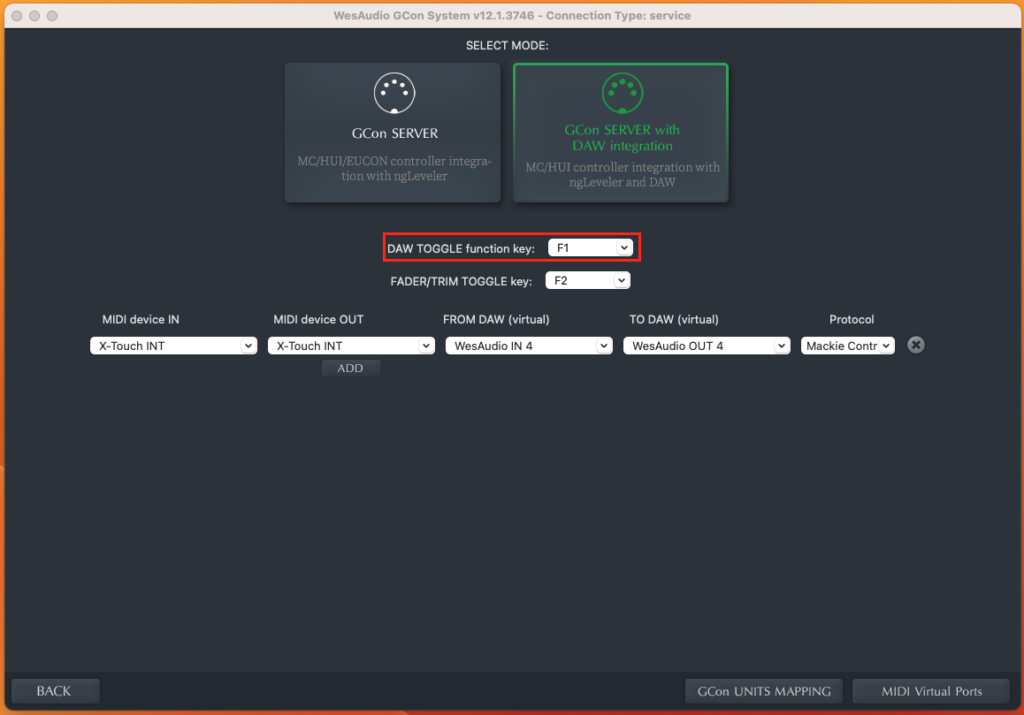
DAW Toggle Functionality
In the GConManager _CONTROL application, you can assign function keys (F1 to F8) to switch between different control modes:
- DAW Session: When a function key is assigned to this mode, its LED will blink, signaling that control is focused on the Digital Audio Workstation (DAW) session.
- ngLEVELER(s): When a function key is assigned to this mode, its LED will remain steady, indicating control over the ngLEVELER(s).
TRIM/FADER Toggle
After completing this guide you will be able to control ngLEVELER plugin and DAW by using function key F1 and F2 on your Behringer X-Touch.